Get Canon Colors on Your Sony Camera with In-Camera Settings
- Aug 12, 2025
- 5 min read

Canon is well known and love for its color science, especially when it comes to the natural looking skin tones it renders. Way before Fuji made film simulations a thing, Canon was already a favorite for both video and photo.
But the question is: can you get Canon colors on Sony cameras? The answer is yes, and today I'll show you how to get that Canon color profile using in-camera settings only, namely the Picture Profile and Creative Look settings.
I’ll be following a similar process to what I used when recreating S-Cinetone and Fuji colors on Sony — dialing in settings step by step to match the look as closely as possible.
And I'll share a Creative Look preset, as well as a custom Picture Profile down below. Let's get started!
Table of Contents
Why Recreate Canon’s Color Science on Sony?
If you’ve ever compared Canon and Sony side by side, you’ve probably noticed it: Canon colors tend to look softer, warmer, and more forgiving — especially on skin. Sony, on the other hand, gives you more control, but often needs extra tweaking to get that same natural, balanced look.
My Experience with Canon cameras and their color science
A few years back, I worked at a small production studio where Canon was the default. I used everything from the C100, C200, and C70 to the R5C, R6, RP, and even the old 5D Mark II.
Personally, I’m not a huge Canon fan, mostly because of how they cripple features across models to push upgrades. From my perspective, companies like Canon didn’t really start innovating until Sony started shaking things up. (Not that Sony’s been pushing the envelope lately either, but that’s a different conversation.)
Aside from that, Canon has been known to release cameras before they were ready or functional to use due to overheating, or to repackage two older models into a ‘new’ one—similar to what Sony has started doing recently.
That said, while I’m critical of their business strategy and how they treat their customers, I completely understand why so many people love Canon’s color science, especially for skin tones. It’s flattering, soft, and pretty forgiving straight out of camera, something you notice immediately when switching between brands.
During my time at the studio, I had the chance to work with a wide range of Canon gear: C100, C200, C70, R5C, R5C II, R6, R, RP, 5D Mark II, and more. That hands-on experience gave me a good sense of how Canon’s color rendering varies from model to model, but also what stays consistent — especially when it comes to skin tones and overall hue balance.
So even if I don’t align with Canon’s philosophy as a brand, I do appreciate the natural, flattering color profile many of their cameras produce, and I’ve used that knowledge to build color recipes that emulate that Canon look on other systems like Sony.
Canon Color Science & Variability Across Models
When people talk about “Canon colors,” they're usually referring to a certain look they’ve come to associate with Canon cameras. However, Canon’s color science isn’t at all the same across all their cameras. In fact, it has evolved significantly over the years. The look you remember from an older DSLR may differ from what a newer Canon mirrorless camera produces.
This isn’t unique to Canon. All brands — Sony, Fujifilm, Nikon, Panasonic, Olympus — constantly refine and tweak their color science with each new generation. So when we say "Canon colors," we’re really referring to a general aesthetic rather than a fixed standard. Our own perception is shaped by the specific models we’ve personally used.
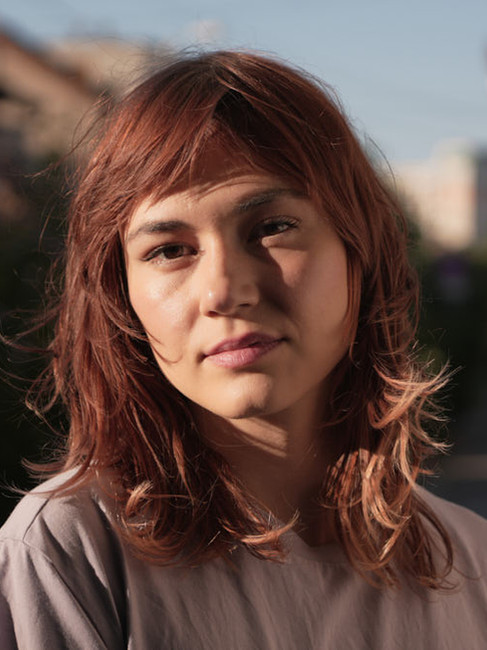
What Makes Canon Skin Tones Look So Appealing?
There’s no one Canon “look,” but here’s what people usually associate with Canon skin tones:
Soft contrast
Slightly desaturated tones
Warm, pinkish/magenta tint
Light, bright skin rendering
That combo is why Canon is so popular for portraits. It gives most skin types a natural, flattering glow, no extra color grading required.
And I've been wondering whether we can make Sony colors look like Canon, without post-processing in Lightroom or LUTs. I think I found a way to closely match that signature Canon color profile, even on a Sony system.
How to Get Canon Colors on Sony Cameras Using Picture Profile And Creative Looks
If you’re after that soft Canon feel on a Sony, I recommend using the Picture Profile menu, and not Creative Looks. Why?
Well, Picture Profiles give you deeper control — things like gamma curves, color phase, and individual color depth — which lets you fine-tune the image to match Canon’s skin tones and overall hue.
That said, if you're after a quicker setup, you can still get pretty close using the Neutral Creative Style or a NL Creative Look. These provide a solid base that already resembles Canon's color palette — often without needing any extra tweaks. For a touch of warmth and a more Canon-like skin tone, try adjusting the Color Filter to A2.5 / M0.75. It gently shifts the image toward that signature pinkish hue Canon is known for.
👉 An in-depth look at Picture Profiles vs Creative Looks.
Quick Canon-Style Preset Using Creative Look NL
If you’re not ready to dive into Picture Profiles, here’s a solid starting point using the NL Creative Look (or Neutral Creative Style on older cameras):
Canon Color Profile for Sony | Creative Look settings
Creative Look / Creative Style NL
Contrast -5
Highlight +6
Shadows -3
Fade +1
Saturation -2
Sharpness 0
Sharpness Range 1
Clarity 0
White Balance settings
WB : AWB White
Color Filter: A2.5 / M0.75
Before - After Canon Creative Look recipe comparison


Tip: This is perfect if you want a simple portrait look without touching the Picture Profile menu. For the best settings to get Canon colors, use the Picture Profile menu.
Custom Picture Profile Settings for Canon colors
Want something more accurate and flexible? Use this custom Picture Profile recipe. It gives you that soft contrast, flattering skin tone often associated with Canon cameras.
Canon Color Profile for Sony | Settings
Black Level +5
Gamma Movie
Black gamma Wide +7
Knee Auto
Color Mode: Still
Saturation: - 6
Color Phase +2
Color Depth:
Red: -2
Magenta -2
Yellow: -2
(Optional): WB : AWB White
Color Filter: A2.5 / M0.75 to give your images a warm peachy tone.
The picture profile recipe will give you a soft, natural look with gentle bright skin tones — much like what you might expect from Canon's color science.
Personalize it: Push Blue & Cyan to +3 for deeper blues. Bump Green to +7 if you like richer greens.
Before - After Canon look Picture Profile recipe comparison

A Note on Accuracy
Keep in mind, though, that every Canon/Sony model handles color a little differently. If you're aiming for a perfect match to a specific model, you'd need to compare specific cameras side by side and try to match them by customizing this recipe.
But for most people, this simple preset should give you a Canon-style look with minimal hassle — ideal for portraits, natural light, and general color harmony.
Final Thoughts
If you enjoyed this Canon color profile recipe for Sony, feel free to share it — and check out my other Sony film simulations and color presets designed to bring unique, film-like character to your JPEGs.