Classic Filmic Log to Rec709 - Free LUT & Power Grades Davinci ( Sony & More)
A straightforward Log to Rec709 workflow that starts off with a subtle film look for you to build on. Compatible with Sony, Fuji, Nikon, Canon, Panasonic, Blackmagic, RED & ARRI cameras.
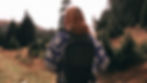
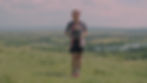
Starting from flat Log footage can be tricky. This free Log to Rec709 LUT and DaVinci PowerGrade pack delivers a subtle, filmic base with natural skin tones and smooth contrast, so you can set your color grading workflow in motion.
Included in this free PowerGrade & LUT pack
- 2 .DRX Powergrades for DaVinci Resolve.
Pre-built node structures you can easily adjust and build on. One soft and balanced Power Grade for everyday work, one darker and moody for dramatic looks.
Each PowerGrade includes a final CST node - meaning you set the exact Log curve and color space your footage was shot in, so your conversion to Rec709 is accurate, clean, and consistent across cameras.- .CUBE LUT File
Compatible with most video editing software, such as DaVinci Resolve, Premiere Pro, or Final Cut.
Apply it and start grading immediately. The log to rec709 LUTs were tested on Sony, Fuji, Nikon, Canon, Panasonic, Blackmagic, RED & ARRI cameras.
Got any questions?
If you come across any issues or have additional questions – Drop me a message via chat or email, and I’ll get back to you ASAP.
License
It cannot be resold or shared, the license you are being granted for this product is only for personal use and not for resale or sharing with others on different channels. For anyone interested in these LUTs please direct them to the website where they can download it for free. Thanks
Why both a PowerGrade and a LUT?
I usually grade with PowerGrades because they’re just more flexible. You can dive into the node tree, turn nodes off and on, tweak anything you want, and actually see how the look comes together.
Each free PowerGrade uses DaVinci’s Color Space Transform (CST) tool, which is a much better way to convert Log to Rec709.With CST, you tell Resolve exactly what Log curve and color space your footage was shot in, and it maps that data correctly into Rec709..Aka no harsh clipping and no weird color shifts.
Actually, I recommend giving this free PowerGrade pack a go if you’re just starting out in DaVinci Resolve, because the node tree structure also helps you understand DaVinci’s base workflow as you go.
But if you’re more comfortable with LUTs, or just need something quick for a fast turnaround, those are included too.
Why You’ll Love This 💚
Accurate colors from the start – Both the LUT and PowerGrade are built around the same color base. The PowerGrade uses DaVinci’s CST for full accuracy and control, while the LUT gives you the same look in a quick drag-and-drop format.
Flexible setup – Use the one click PowerGrade for full control and learning the DaVinci workflow, or grab the LUT when you just need a quick starting point.
Easy to use – Drop it into your timeline, pick your Log curve & color space, and you’re ready to grade.
A filmic base look that works anywhere – Get natural contrast and color straight away, then shape it into your own look. Works across Sony, Fuji, Canon, Blackmagic, RED, and more.Is This Just a Log to REC709 Conversion Pack?
Nope, think of it as a workflow starter kit for grading.
This pack gives you filmic colors right off the bat and room to push them in any creative direction. The idea is to spend less time dealing with technical conversions and more time adding your touch to the footage.
Node Tree Structure For The One Click PowerGrades
For DaVinci Resolve Users
This PowerGrade comes with a ready-to-go node tree designed to get you from Log footage to a polished look. You can disable any node (Select + 'D') to see exactly what it contributes to the image.
1. NR (Noise Reduction) Cleans up sensor noise before grading to ensure a clean canvas.
2. Temperature Adjusts white balance and overall warmth/coolness early in the chain.
3. Contrast Sets the tonal foundation—shadows, midtones, and highlights.
4. Color Grading - this is the of this subtle filmic grade.
5. Film Damage Adds texture, scratches, or subtle imperfections for that analog feel. (Placed after grading so the texture isn't distorted).
6. Desharp / Soften Takes the "digital edge" off footage.
7. Grain Adds natural, filmic texture. This sits on top of the finished look.
8. Color Space Transform (CST) The final step. Converts your footage from Log to Rec709 accurately.
How to install Powergrades in Davinci Resolve?
Step 1 – Locate the PowerGrade folder
PowerGrades live in the Gallery. You need to copy the .drx files (or the folder they’re in) into your PowerGrade Library:- Mac: /Users/[YourUser]/Library/Application Support/Blackmagic Design/DaVinci Resolve/Support/Resolve Disk Database/Resolve Projects/Users/Guest/PowerGrades/
- Windows: C:\Users\[YourUser]\AppData\Roaming\Blackmagic Design\DaVinci Resolve\Support\Resolve Disk Database\Resolve Projects\Users\Guest\PowerGrades\
| Tip: Copying the folder keeps your grades organized in subfolders inside Resolve.
Step 2 – Open DaVinci Resolve
Launch (or restart) Resolve. Your PowerGrades should now appear in the Gallery panel.
Step 3 – Apply a PowerGrade- Open the Color Workspace.
- Go to the Gallery panel (top-left by default).
- Browse your saved PowerGrades.
- Drag and drop the grade onto a clip, or right-click a grade and choose Apply Grade.
Step 4 – Set the correct input
Before the PowerGrade works as intended, make sure your clip is set to the correct Log curve and Color Space Transform (CST) node.
To do that, click on the CST node. In the Settings (top-right), you’ll see the CST parameters. From here, you can set your input.- Input Color Space: choose your camera’s color space (e.g., Sony S-Gamut3.Cine, Canon Cinema Gamut, Arri Alexa Wide Gamut, etc.).
- Input Gamma: choose the Log curve your camera used (e.g., S-Log3, S-Log2, C-Log, V-Log, etc.).


